Tuesday, 28 May 2013

Not Heavy Metal

Here we go, its May and time to start on the metal.  Doors have been removed. They are in ok shape, we have started to sand them down and are working the dings out. They can get primed and painted very soon.


Its getting warmer outside so we wheeled the MG out into the yard to do the metal work.  First was to get the rear quarter panels cut out. I started on the passenger side since it was in the worse shape and we had the new panels ready to go.


That wheel arch is a real bummer, had not expected that at all.  But it makes sense, once there was a gaping hole in the quarter panel there was lots of room for the wet and grit to make its way up there and sit.  That repair will have to wait until the new part arrives. I could have crafted one out of some scrap but we wanted to make sure that the wheel arch was perfect, way to easy to mess that up so we will wait.


The old metal has been cut out and primed for welding.  The new panels have been dry fit and are ready to go in.  Our first bit of welding on this car is about to commence.


There it is with both the inner and outer sections welded in.  Now on to the other side.


All cleaned up, and with the inner rocker repair welded in.


Here is the outer patch to go in.


Installed and ground flat.  That's it for the quarter panels we can start on those fenders now.

Sunday, 26 May 2013

Check out that Brooklands Green!

We have almost 5 months to get this car painted and back together.  That should be an easy task you would think for any shop.  But I don't work on it during the week, and every other weekend I am available to help out.  So its going to be a stretch to get it done.  Thankfully I have a fantastic Auto Body guy to get the car prepped for paint.  He is well aware of the timeline and is working pretty hard to make it.  He went ahead and prepped and painted the Hood and Trunk lid before we started on the major metal work on the B.


Just look at that finish, its like a mirror.  If the rest of the B turns out like this I will be more than pleased.

Saturday, 13 April 2013

Making the move

Countdown to paint is on!  5 months until the shop closes for business so I need to get the MG out to Bragg Creek for final metal prep and paint.  It's stripped down now and I have rented a trailer so I can haul it to Bragg Creek.  A few last minute items to remove before it head's out.


There it is, all loaded.  It was a bit tricky loading it in the pitch black.  Especially when the doors wanted to swing open.  Once I had the doors tied down I tried again, and was successful.  The little beast sure wants to spin the tires. I am sure I woke a few neighbors trying to get it loaded up.  Of to Bragg Creek in the morning!


The shop manager was there to help me unload the MG.  It would be spending the summer here, and as long as we put the time in it should be done by the drop dead date of September 1.  Notice the 51 Chev 1300 in the other bay. Another project that was being hauled in to Calgary for some repair.


Monday, 4 February 2013

Removing Carpets and Trim from a 1978 MGB

I have roughly 6 months to get this MGB repainted.  I have spent the winter in the garage stripping the car down, cleaning parts, and bagging them in my store room.  As I have been pulling the parts off I have created a list of parts that need to be ordered or sourced from somewhere.  I am just about at the point where I can get this car off to the shop for metal work. That will be a major milestone in this restoration so time to get to it.

Out come those carpets.  They are in pretty decent shape so I will be just cleaning them up and reinstalling them.


First out come the seats.


Once the seats are out, then need to remove the centre console and the carpets can come out.


Floors have some minor surface rust but nothing major.  No holes in the floorpan.


There we go, no more carpets, no more trim, no more windscreen.  Looks like its about ready to head for paint.

Friday, 1 February 2013

Stripping the doors

Next up in the repainting process was to strip the doors.  This was a fair bit of work, the window actuators needed to come out along with the glass, then the 'smoker' windows and the glass channels.  I was going to leave the doors on the MG so we could ensure they fit properly but they would come off in order to do the paint.


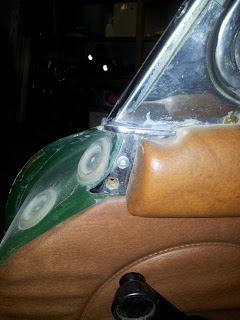
Door cranks and armrests came off.  Note the interior trim is Autumn leaf brown. I have decided to go with an all black interior so I will be selling this trim on Kijiji.  After the armrests, door latches and the cranks are off the trim can be removed.


This plastic was not original, I had replaced the original when I did the trim kit in the 90s.


Door latches, actuators and glass were removed.  I followed the procedure in my Haynes manual which gave very clear instructions and process for doing this.  By the time I was done the door was completely stripped. On to the other side!

Wednesday, 16 January 2013

What rust?

Some decent pictures of all the rust was needed for the paint man.  He wanted to know what he was getting himself into and whether we were really going to be able to meet the September deadline.  From his experience he knew that any surface rust was liable to turn into giant gaping holes in the bodywork.  I offered up my welding services and suggested that I could do the repairs, his response was I had better get ordering some metal patches so we could get going on the repairs as soon as the snow melted.


Right side rear quarter panel, in front of the rear wheel.  I ordered an outside and inside patch for this side.


Right side rear quarter panel, behind the wheel.  Surprisingly this was in decent shape.  I am guessing this car had mud flaps installed at one time.  Note the MGB decal for the Mark IV.  I will not be putting these back on since they scream 70's!


Left hand side rear quarter panel in front of the wheel well.  It appears that this is just a little bit of surface rust.  By the time I get through prepping this section I am convinced it will be right through to the inner rocker.  I may even have to patch the inner wheel well.


The right hand front fender.  That looks like a nasty combination of rust and bondo.  A light sand should do it?  By the time we peeled back all the paint and bondo we discovered the MG had been in a front end collision and there was no way to repair this fender.  A new one was ordered from Moss, the money spent saved hours in prep and potential future problems.


Behind the license plate.  This looked far worse that it turned out to be.  I thought there was going to be a huge hole behind the plate but it turned out to be just surface rust.

The first batch of parts was ordered and I continued to work on stripping the car down.


Wednesday, 12 December 2012

Boot lid and Bonnet

Or if you prefer the North American pronunciation, Trunk and Hood.  We stripped these parts at the Bragg Creek shop using a stripping wheel on an angle grinder. The wheel took the paint of really well but we were careful not to stay in one place too long as it can heat and warp the metal.


Close up view of the heat treated and repaired fold in the trunk lid.  As part of the rebuild I have purchased the gas strut kits for both the hood and trunk.  These along with the removal of the luggage rack should prevent this sort of thing from happening.


Here is the sanding wheel we used, purchased from the local auto body store.  You can tell its peeling that Brooklands Green paint off quite well.


The hood was stripped, the insulation will be replaced and all the bits will be cleaned, sandblasted and repainted. Overall the hood and trunk were in good shape and had very little rust on them.  As part of the prepping process the metal will be washed in acid and any remaining rust will be treated before primer sealer.

Tuesday, 6 November 2012

MGB Strip

So my folks are selling the acreage and moving to town.  Along with that goes my Dad's workshop and downdraft paint booth.  If I want to get this MG painted I need to get it stripped and ready in the next 8 months.  That should be plenty of time right?  8 months to strip, weld, prep and paint.  I guess I better get started on this.  Due to the short timeline, and the fact the engine is in good shape, I decided to leave the drivetrain in.  Everything else was going to be removed.


I started by removing the hood and trunk, they were sent out for prep and paint.


The rubber bumpers came off as well.  I thought I might be able to sell these to someone but the global market for these things is zero. I am not sure how much they weight but I am guessing they are about 150 lbs a piece. I asked the local MG guy if he wanted them and he just laughed at me.


I parted the luggage rack from the trunk lid and managed to sell this on kijiji right away. I tried to throw in the bumpers but the purchaser didnt want to have to pay the shipping.

Monday, 12 March 2012

Moving out

March of 2012, I moved the MGB out of the house garage and into the Lakeview Townhouse.  The Townhouse has a double tandem garage, so lots of room to take the MGB apart.  My dad and I had worked on the boot lid a bit getting the bend out of it and removing the luggage rack.  You can see from the picture the spots where we had to do a little welding.


Once the car was safely stowed in the new Townhouse garage we could get to work taking it apart.


Lots more room! I think I could fit a few MGBs in here.  My dad tells me you need twice as much room as the car if you are going to be doing a restoration.  If I run out of room here (doubtful) he has lots of room at his shop in Bragg Creek to store a few parts.


While I was moving the car I even took it out on the freeway and checked the motor.  It definitely still runs very well, it gets up to speed quickly and top speed is about 160 kph.  It certainly could use a fifth gear, which would increase that top speed.


Friday, 6 June 2008

Minor tweaks - new muffler

The incessant rattle from the muffler was making my skull hurt. Time for an upgrade! A muffler kit from moss was ordered along with all the required clamps and brackets. Oh and while I was at it I decided to add a rear lowering kit to my order. Well, and I put electronic ignition in the cart. And, since I was placing an order, I might as well include a high performance fuel pump.

When all those goodies arrived I went to work on the car. I am excited to say the rattle is gone, it idles much better and the profile looks great with the lowered rear end. The fuel pump was put in as well although I didn't see much of a difference there. That should be it for a while, which is a good thing with an ever expanding family!

With the new baby I don't imagine I will get to the MGB for a while. She is nicely tucked away in the garage, waiting for the day when we can go for a ride. The MG that is, the baby gets a room of her own.

Looking back I have done a ton of work on the car. It runs great, has new suspension and tires which make it a joy to drive. The next big project is to paint it. But with other priorities that is going to have to wait. Which will give me some time to plan out exactly what I want to do to the car.

It won't be just a straight forward paint job. The color will stay the same, brook lands green, but I plan on putting an air dam on the front, remove the luggage rack, a few other minor modifications.

Stay tuned!

Tuesday, 5 June 2007

New head.

I finally saved up enough money to have the head for the MG rebuilt.  I took it to Mic Jones and he did a fantastic job on it.  He replaced the valves with bigger ones, both intake and exhaust.  All of the valve guides were replaced, and it got triple springs.

Mic asked me why I didn't do this work when I got the motor redone.  I told him I thought I had.  Turns out Auto-Mann had just done a simple overhaul on the head.

Anyway, I have a new head ready to go on the motor.  I ordered a few parts from Moss, including a new high performance head gasket.

Once I had the head back on I took it back to Mic to have the carbs tuned.  He tuned them up and the car is running in the best shape of its life.

Baby number two has arrived - Eden Drew.

Monday, 23 August 2004

Floated valve

I havent written on this blog for quite a while.  I have lots of updates, just none on the car.  I got married in 2001 and had my first kid, a boy, Griffin in 2003.  Not surprisingly the car was a lower priority for a few years.  

In August I decided to take it on a road trip to Edmonton.  My friends are members of the West Leduc Antique Society and I was going to go up to participate in the weekend events.  Since I hadn't taken the MG for a drive in some time I dusted her off, changed the oil and hit the highway.

The motor ran quite well, but at high rpm it was starving for fuel.  Passing cars on the highway was a bit of challenge.  I made it to Edmonton okay though and we decided to have a look at it.  First things first was to change out the fuel filter.  A test drive proved that was the culprit.

The next morning I drove to West Leduc from my buddies house in Edmonton.  On the highway it was quite noticeable, the car could really move.  Unfortunately I pushed it a little too hard.  Somewhere around 160 it choked.

I floated a valve.

I got towed back to the antique show and we took off the tappet cover.  Sure enough, one bent valve.  I thought about trying to get it back under the rocker but then thought differently.  I didnt want to risk a long trip home with a faulty engine.

So I found a car hauler and towed the MG back home (again).  And there it sits.  Waiting for a new head.

Monday, 23 August 1999

New motor - running well

The summer of 1999 my MG was running the best it had ever run since I bought her in 1992.  The new engine ran great.  A new alternator had fixed the electrical issues.  The new interior was like new.  I drove that car every opportunity I got.

I even made some long distance trips in the MG, including a few to Edmonton.  I tried my best to find some back country roads to drive on when I could.  These cars are a lot more fun to drive when the road isnt straight.


Thursday, 5 March 1998

Rods bachelor party

After having the engine redone the car was an absolute joy to drive.  I drove it a lot and then parked it for the winter in my backyard.  Come spring it was time to get it out again.

My best friend Rod was having a batchelor party at drumheller provinical park.  I decided to drive the MG out there.  It is about a 3 hour drive from Calgary and I hadnt put that many highway miles on the car.  I was taking a bit of risk but didnt think anything of it.

I got as far as Cluny.  Do you want to know whats in Cluny? Not much.  The car just stopped firing, turned out the alternator was no good and I had been driving the car on battery power alone.  It wouldnt even turn over.  So a quick call to the AMA and I got a tow back to Calgary.

It was almost midnight by the time I got home, I loaded up my truck and headed out again.  I made to Dinosaur park by 2am just in time to go to sleep.

I can't remember how many times that MG has been towed.  Too many. And I am sure it wont be the last.

Sunday, 23 March 1997

More money than brains...

My Dad uses the saying '...got more money than brains...' quite frequently.  You would think it would have sunk in.  After roaming around Australia for a while, I came home and got another engineering job.  I was living at home and pulling in a pretty decent wage.  Thanks Mom and Dad for not charging me rent!  The MG ran well, and cornered well with those tires, but it needed some more power.  I decided to spend some of my hard earned money on a motor rebuild.

I removed the motor from the car with the help of my brother. We took the head off, drained the oil and managed to lift it out of the car with muscle power alone.  Once it was out, we took it in to the mechanic.  I had the motor rebuilt in Calgary by Auto-Mann.  They bored it out to a 2.0l, put in a high lift cam, converted it to twin SU carbs and a few other treats including a header.  It took a few weeks to have it all done, and once it was finished they called me to pick it up.

Malcolm gave me pretty strict instructions to not try starting the motor once it was back in the car.  He wanted to make sure that all their hard work was not going to go to waste.  My Dad and I dropped the motor back in the car and joined it with the transmission once again.  Now just to get it back to Auto-mann for start up.

I had a friend who owned a car hauler.  He offered to haul the car back to Auto-mann for the finishing work.  We loaded up the car up ready for transport when my friend asked me, 'do you want to drive it?'  

'Huh?' I replied, 'what do you mean?'

'Hop in the back, you can ride in the car into town.  You probably miss driving it, so this is an opportunity for you.'

Well, I couldn't resist, I hoped in the drivers seat and road in the car, on the car hauler, back to Auto-Mann.  That must have been quite the sight for passing motorists.

Correction: we made one stop along the way,  A charity car washing event.  After getting the car nicely polished, we took it to Auto-mann and unloaded it from the car hauler.